Set up the verification environment
Before deploying a ZK verified task, you must configure a runtime capable of ingesting and validating cryptographic proofs. The standard approach involves deploying a node client that connects to a dedicated verification layer, such as zkVerify. This infrastructure offloads the computational heavy lifting of proof validation from your primary application, ensuring that your dApp remains lightweight while maintaining strict trustless guarantees.
Initialize your project directory and install the official zkVerify JavaScript SDK. This package provides the necessary interfaces to construct proof requests and handle verification responses. Run npm install @zkverify/sdk to add the dependency to your project.
npm install @zkverify/sdk
Create an environment configuration file to store your API credentials and the zkVerify RPC endpoint. You will need to generate an API key from the zkVerify developer portal. Ensure this file is added to your .gitignore to prevent credential leakage.
// .env
ZKVERIFY_RPC_URL="https://rpc.zkverify.io"
ZKVERIFY_API_KEY="your_api_key_here"

Instantiate the client in your application entry point. Pass the RPC URL and API key to establish a secure connection. This client will handle the serialization of proof data and the communication with the verification layer.
import { ZkVerifyClient } from '@zkverify/sdk';

const client = new ZkVerifyClient({
  rpcUrl: process.env.ZKVERIFY_RPC_URL,
  apiKey: process.env.ZKVERIFY_API_KEY,
});
Run a simple health check to ensure your environment is correctly configured. Use the client to query the network status or verify a sample proof. If the connection fails, check your network proxy settings and API key permissions.
try {
  const status = await client.healthCheck();
  console.log('Verification environment ready:', status);
} catch (error) {
  console.error('Connection failed:', error);
}
With the environment configured, your application is now equipped to handle proof verification. The next phase involves generating the actual proofs and submitting them for verification.
Generate proofs for task completion
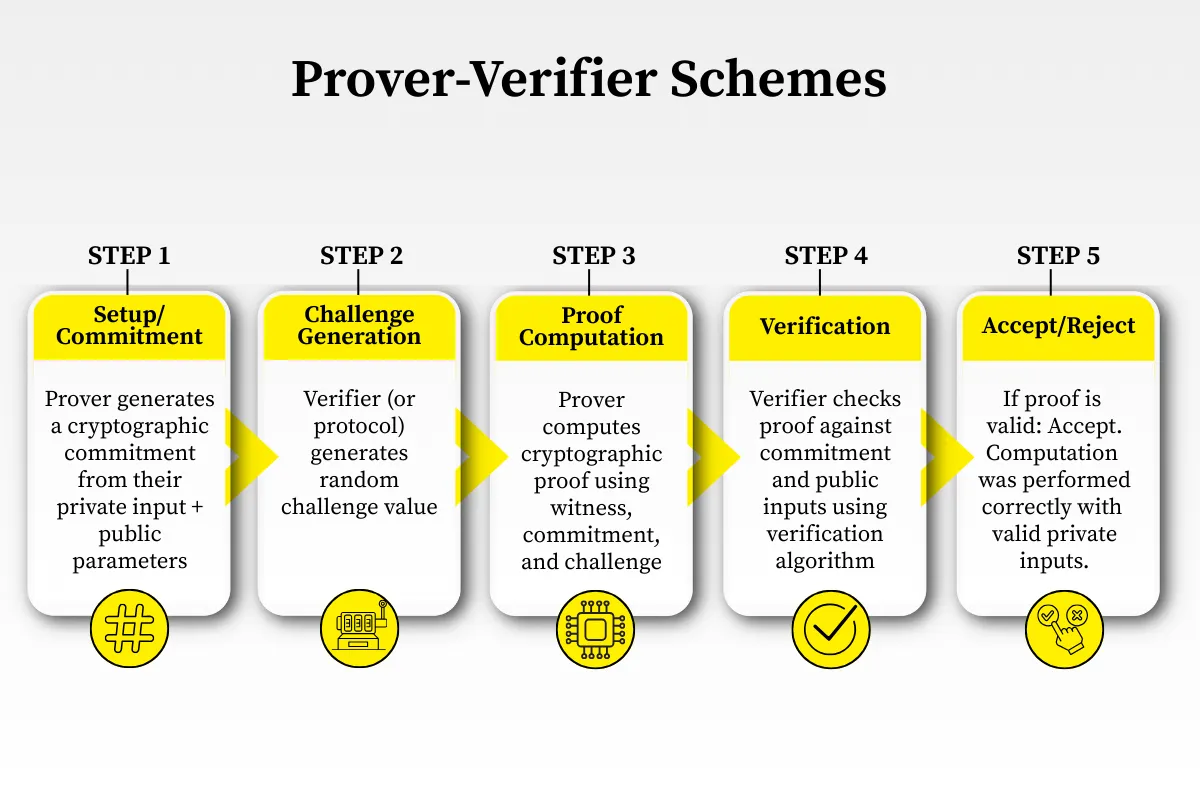
To automate tasks trustlessly, you must generate a zero-knowledge proof (ZKP) that attests to the correct execution of a task without exposing the underlying data. This process involves a prover executing the computation and producing a cryptographic proof, which a verifier can then check on-chain.
1. Define the Circuit
The first step is to translate your task logic into a circuit. A circuit is a mathematical representation of the computation you want to prove. It consists of public inputs (e.g., the task result) and private inputs (e.g., the sensitive data used to compute that result).
Using a framework like Circom or SnarkJS, you define constraints that the private and public inputs must satisfy. For example, if your task is to verify a signature, the circuit ensures that the signature is valid for the given message and public key, without revealing the message itself if it’s private.
// Example: A simple circuit to prove knowledge of a secret
// that hashes to a known public value
const { buildCircuit } = require('snarkjs');

const circuit = async () => {
  const { json, wasm } = await buildCircuit(
    './circuit.json', // Your circuit definition
    'groth16'         // Proof system
  );
  return { json, wasm };
};
2. Setup the Trusted Ceremony
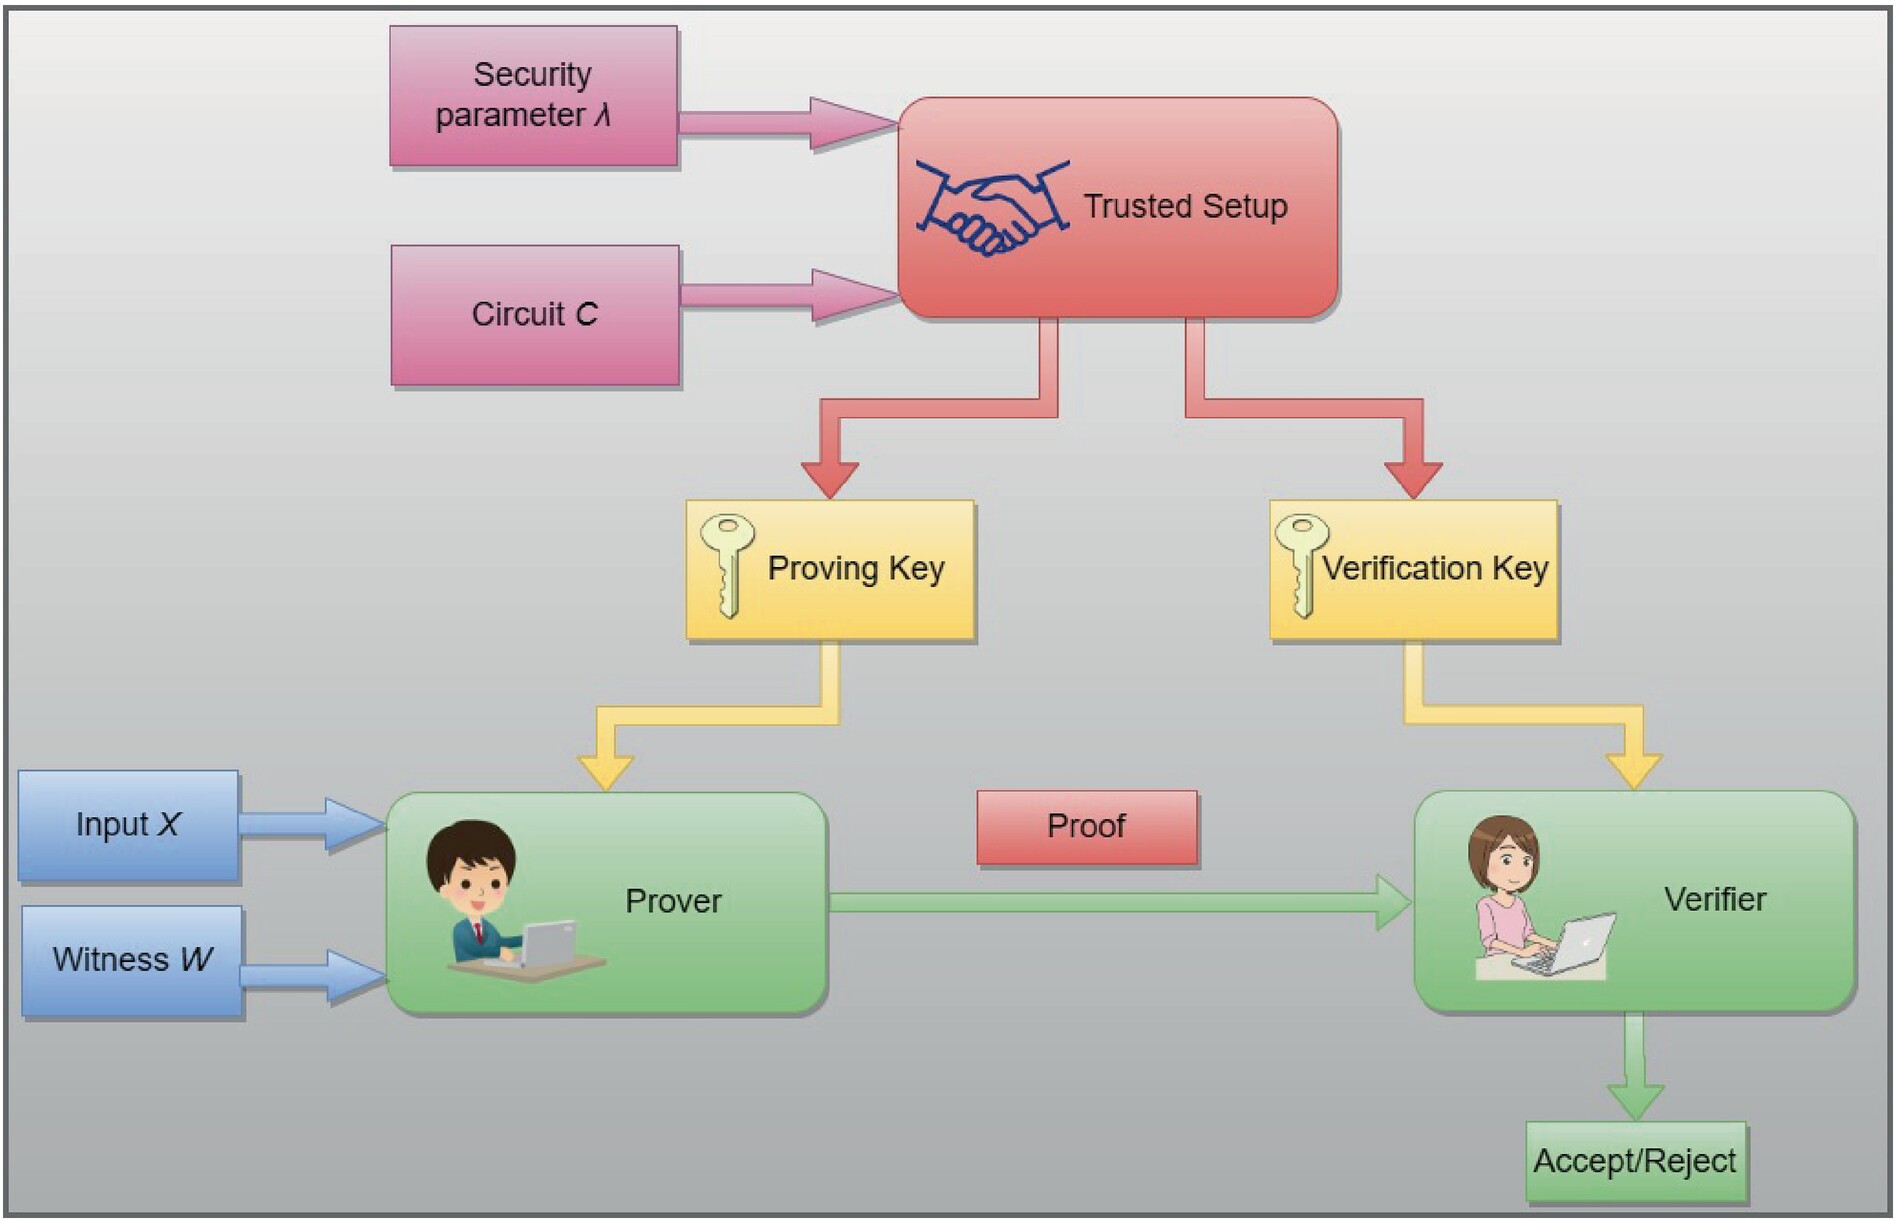
Before generating proofs, you must perform a trusted setup. This process generates public parameters (a proving key and a verification key) based on the circuit. The security of the proof system relies on the randomness used during this setup.
For production systems, use a multi-party computation (MPC) ceremony to ensure no single party knows the "toxic waste" (the random secret). Tools like snarkjs or specialized platforms like Zokrates facilitate this. Never reuse parameters from a public testnet for mainnet applications.
3. Generate the Proof
With the circuit and setup keys ready, the prover executes the task. The prover takes the private and public inputs, runs the computation, and generates a proof. This proof is a compact cryptographic artifact that can be verified quickly.
The proof generation is computationally intensive but can be parallelized. For high-throughput applications, consider using a dedicated proving service or hardware acceleration. The output is typically a set of field elements representing the proof.
// Generate proof using the generated keys
const { generateProof } = require('snarkjs');

const proof = await generateProof(
  circuitJson,
  wasmFile,
  { secretInput: 123, publicInput: 456 } // Inputs
);
4. Verify the Proof On-Chain
Finally, submit the proof to your smart contract. The contract uses the verification key to check the proof against the public inputs. If the proof is valid, the contract executes the automated task.
Ensure your contract includes checks to prevent replay attacks, such as requiring unique task IDs or using a Merkle tree for batch verification. This step completes the trustless automation loop, as the contract can now rely on the ZKP to confirm task completion without trusting the prover.
// Solidity verification snippet
function verifyProof(
    uint[2] memory a,
    uint[2][2] memory b,
    uint[2] memory c,
    uint[1] memory input
) public view returns (bool) {
    return verifier.verifyProof(a, b, c, input);
}
Translate your task logic into a circuit using a ZK framework like Circom. Define public and private inputs and constraints.

Generate proving and verification keys using a secure MPC ceremony. Store the verification key for your smart contract.
Execute the task with private inputs and use the proving key to generate a compact cryptographic proof.
Submit the proof and public inputs to your smart contract. The contract verifies the proof and triggers the automated action.
Submit proofs to the verification layer
Once your prover generates the zero-knowledge proof, the next step is getting it onto the verification layer. zkVerify acts as a specialized infrastructure layer that accepts proofs from various proving systems and validates them efficiently. This process allows decentralized applications to offload the computational heavy lifting of verification, reducing gas costs and latency compared to on-chain verification.
The submission process involves formatting the proof data, calling the appropriate verification function, and handling the network response. Below is the step-by-step workflow for submitting a proof to the zkVerify network.
Before submission, ensure your proof data matches the expected schema for the target proving system (e.g., Gnark, Halo2, or Plonky2). The payload typically includes the public inputs, the proof bytes, and the verification key ID. Incorrect formatting will result in immediate rejection by the verifier. Use the zkVerify SDK or API client to serialize your proof into the required JSON or binary format.
Send the formatted payload to the zkVerify endpoint. This can be done via an HTTP POST request to the testnet or mainnet API, or by interacting with the smart contract if deploying directly. The verification service will parse the proof, run the verification algorithm, and return a boolean result indicating validity. Ensure your application handles rate limits and network timeouts gracefully during this call.

Process the response from the verification layer. A successful verification returns a status code and a proof ID for auditing. If the proof is invalid, the response will include an error code explaining the failure (e.g., invalid public input or malformed proof). Store the proof ID in your application state to trigger subsequent actions, such as releasing funds or updating a smart contract state, only after receiving a confirmed valid status.
For developers integrating this into existing workflows, zkVerify provides rapid and inexpensive proof verification for any type of zero-knowledge proof. This enables dApp developers to implement the latest zk proving technologies without the overhead of managing complex verification logic on-chain. Refer to the zkVerify documentation for detailed API specifications and SDK examples.
Handle common verification errors
When deploying ZK verified tasks, verification failures are the most common friction point. These errors usually stem from mismatched proof formats, invalid circuit constraints, or network congestion. This section covers the primary failure modes and how to resolve them.
Invalid proof format
The most frequent error is an invalid proof structure. Zero-knowledge proofs are binary artifacts generated by a specific circuit (e.g., Groth16, Plonk). If the prover and verifier do not agree on the proof system, the verification will fail immediately with a format error.
Ensure your prover is using the same circuit parameters as your verifier contract. For example, if your contract expects a Groth16 proof, do not submit a Plonk proof. Verify the proof components (A, B, C points) match the expected field size.
// Ensure proof format matches the verifier
const proof = await generateProof(circuit, inputs);
// Verify the proof type matches the contract expectation
if (proof.type !== 'groth16') {
  throw new Error('Invalid proof format');
}
Circuit constraint failures
If the proof format is correct but verification still fails, the issue likely lies in the circuit constraints. A constraint failure means the provided inputs do not satisfy the logical conditions defined in the circuit.
Check your inputs against the circuit’s public and private input definitions. Common mistakes include:
- Providing inputs in the wrong order.
- Using incorrect data types (e.g., string instead of uint256).
- Failing to hash sensitive data before inclusion.
Use a local verifier before deploying to the mainnet. This allows you to debug constraint violations without incurring transaction costs.
Network congestion and timeouts
ZK proof verification is computationally intensive. During periods of high network activity, verification requests may time out or fail due to gas limits. This is particularly common on Layer 2 networks with limited block space.
To mitigate this, implement retry logic with exponential backoff for verification requests. Consider batching multiple verification requests if your application architecture allows it. Additionally, monitor the network’s gas price and adjust your submission strategy accordingly.
Proof validity and expiry
Some ZK applications require proofs to be valid within a specific time window. If a proof is submitted after its validity period expires, the verifier will reject it. Ensure your application handles proof expiry correctly by checking the timestamp or block number at the time of verification.
Always validate the proof’s freshness if your use case requires it. This prevents replay attacks where an old, valid proof is reused to gain unauthorized access or trigger an action.
Verify task outcomes securely
The final step in deploying ZK verified tasks is confirming the proof on-chain. This ensures the automation workflow proceeds only when the computation is mathematically valid, maintaining trustlessness without exposing private data.
In practice, you submit the proof and public inputs to a verifier contract. The contract runs a verification algorithm—such as verify from a Groth16 or Plonk circuit—to check the proof against the public parameters. If the check passes, the contract emits an event or updates a state variable, signaling that the task outcome is authentic.
This process relies on the mathematical guarantee that generating a valid proof requires solving the underlying problem correctly. As noted in industry analyses, ZKPs provide a sound way to verify computation correctness without revealing inputs or intermediate steps, making them ideal for secure automation.
-
Proof is valid and passed verification
-
Task outcome is committed to state
-
Private data remains off-chain
-
Automation triggers on success
No comments yet. Be the first to share your thoughts!