Set up your crypto wallet
To participate in zkVerify tasks, you need a self-custodial wallet that supports EVM-compatible chains. This wallet acts as your digital identity and payment receiver. It must be capable of signing transactions and connecting directly to decentralized applications (dApps) without intermediaries.
This setup ensures you can securely interact with the zkVerify network. Proper wallet configuration is essential for verifying zero-knowledge proofs and earning rewards accurately.
Connect your wallet to a ZK verified task platform
Before you can earn rewards, you need to link your crypto wallet to the verification network. This connection allows the protocol to validate your identity and task completion without exposing your private keys or transaction history. We will walk through the onboarding process for zkVerify, a primary platform for zero-knowledge proof verification tasks.
Ensure you have a self-custody wallet like MetaMask or Rabby installed. These wallets act as your digital identity on the blockchain. Make sure you have a small amount of the native token required for gas fees on the specific network the task platform uses. Without gas, you cannot sign the verification transactions.

Go directly to the official zkVerify documentation or portal. Avoid third-party links that claim to offer "instant" connections, as these are often phishing attempts. The official site provides the secure gateway to the incentivized testnet where tasks are hosted.
Click the "Connect Wallet" button on the dashboard. Your wallet extension will prompt you to approve the connection. This step registers your public address with the zkVerify protocol. It does not give the platform access to your funds, only the ability to read your on-chain activity for verification purposes.
Once connected, you may be asked to complete a basic identity check or link a social account (like Twitter or GitHub) to prevent Sybil attacks. This step uses zero-knowledge proofs to confirm you are a unique human without revealing your personal data. Follow the on-screen prompts to finalize your profile.
With your wallet connected and identity attested, you are ready to browse available tasks. The platform will now display quests that match your wallet's history and the specific requirements of the zkVerify network.
Complete the incentive testnet tasks
Earning rewards on zkVerify requires you to execute specific on-chain actions that generate zero-knowledge proofs. These tasks are designed to stress-test the network's proof verification capabilities while rewarding early participants. The primary goal is to bridge assets, swap tokens, or interact with smart contracts in a way that creates valid cryptographic evidence for the zkVerify mainnet.
1. Fund your wallet with testnet assets
Before interacting with the zkVerify testnet, you need to hold the native testnet tokens. Most incentive programs, such as those coordinated through Galxe, require you to bridge assets from a supported Layer 1 or Layer 2 network to the zkVerify testnet environment. Ensure your wallet is connected to the correct network and has sufficient balance to cover transaction fees.
2. Bridge assets to zkVerify
Use a supported bridge to move your testnet tokens to the zkVerify chain. This step is critical because the incentive tasks are often tied to on-chain activity within the zkVerify ecosystem. Official documentation from zkVerify and validators like Everstake provides the most reliable bridge interfaces. Avoid unofficial third-party bridges to minimize the risk of losing your testnet assets.
3. Execute swap or contract interaction tasks
Once your assets are on zkVerify, complete the specific tasks outlined in the incentive program. This typically involves swapping tokens on a supported decentralized exchange or interacting with a smart contract that generates a zero-knowledge proof. These actions prove that the network can handle real-world verification loads. Follow the task instructions carefully to ensure your transactions are recorded correctly.
4. Verify proof generation and submission
After completing the on-chain actions, you must ensure that the zero-knowledge proof was generated and submitted to the zkVerify network. Some tasks require you to claim a reward or mint a badge on a platform like Galxe to confirm completion. Check your transaction history and the incentive dashboard to verify that your actions were counted toward your potential airdrop eligibility.
Verify your proof submission
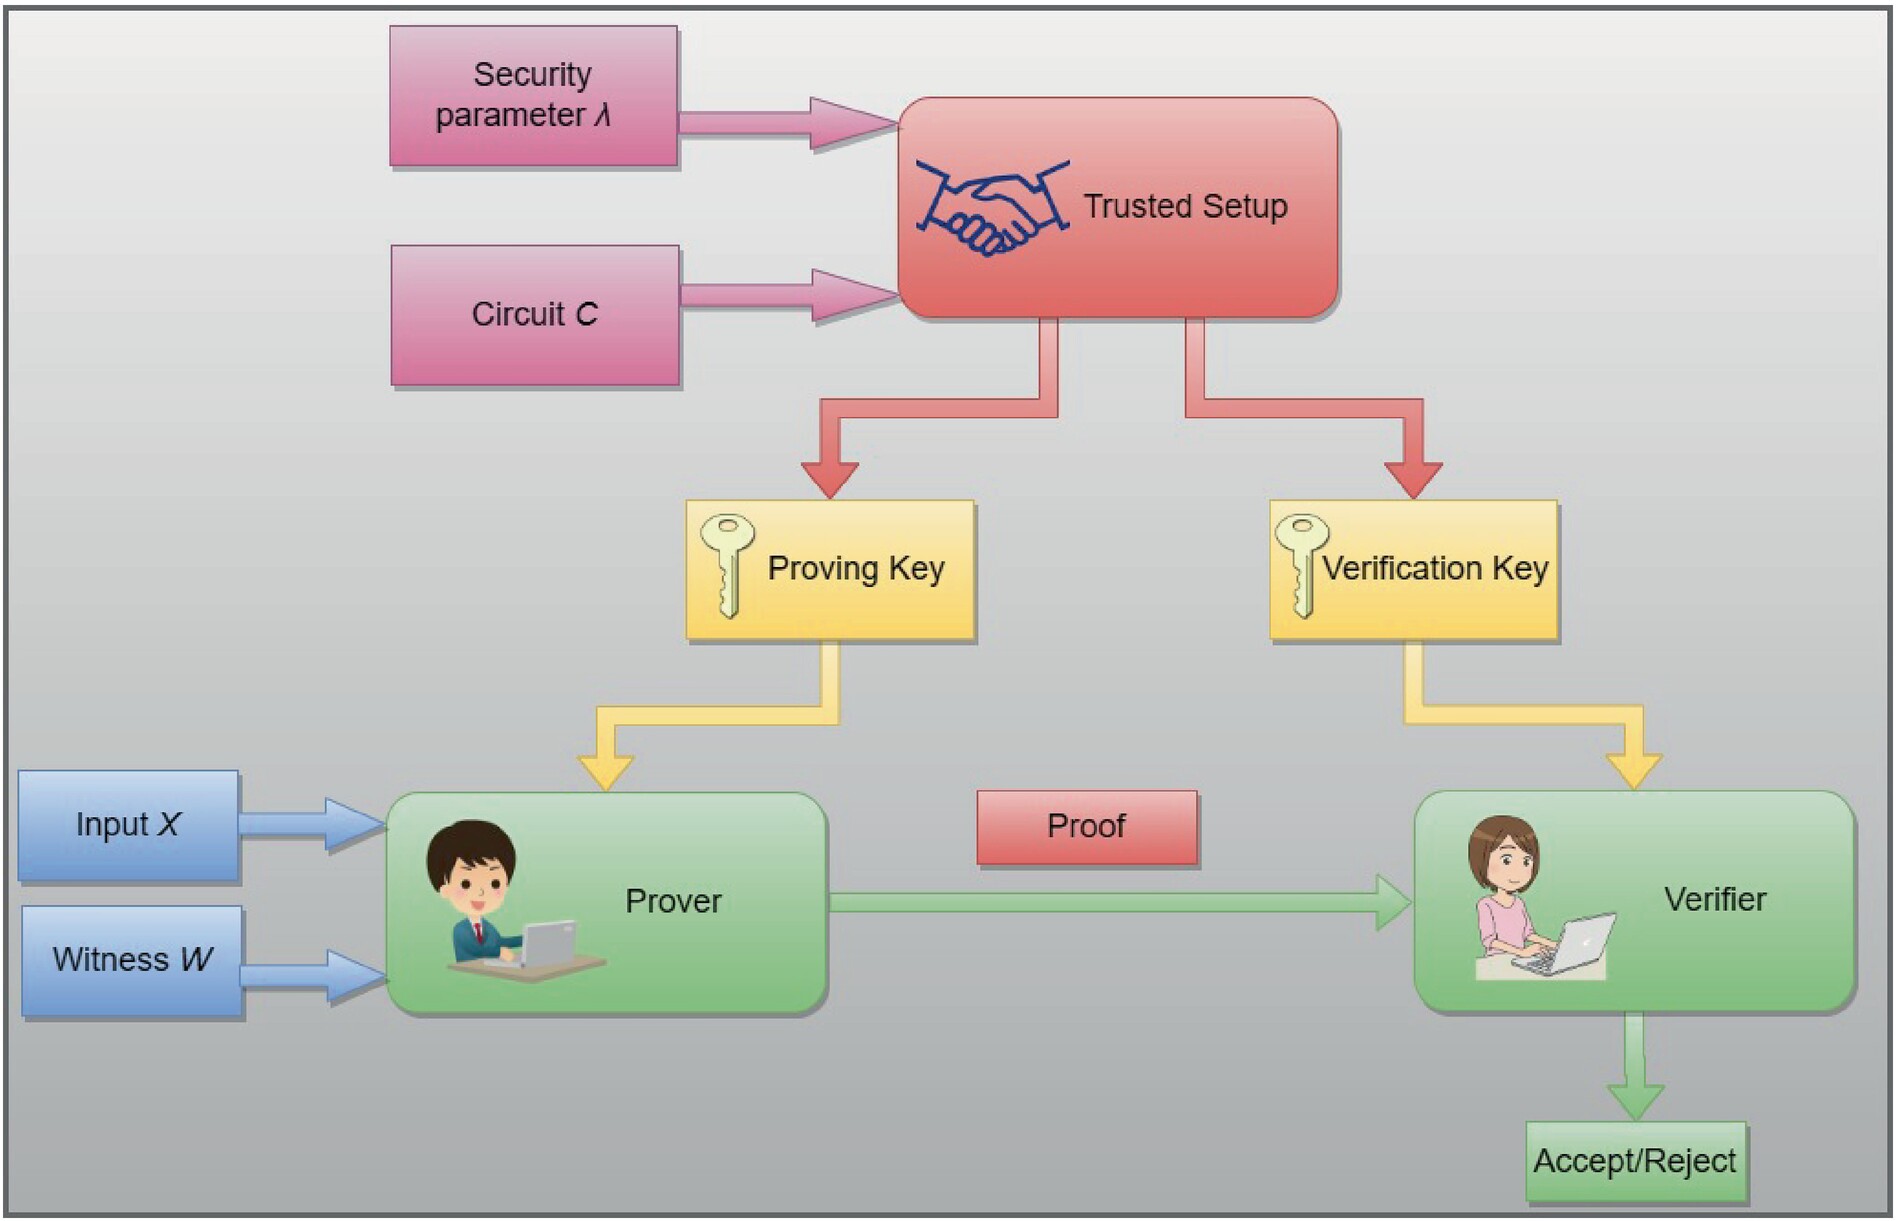
Once you have generated the zero-knowledge proof, the final step is submitting it to the network for validation. This process confirms that your task was completed correctly without exposing the underlying data or intermediate steps. The network nodes act as verifiers, checking the cryptographic signature against the protocol's rules.
To ensure your proof counts toward rewards, follow this sequence:
- Generate the Proof: Use the designated tool or SDK to create the ZK proof from your task data.
- Submit to the Gateway: Send the proof payload to the official verification gateway. Ensure the format matches the required schema.
- Wait for Confirmation: The network will process the proof. This may take a few seconds to minutes depending on network congestion.
- Check Transaction Status: Verify that the transaction hash is confirmed on the blockchain. A confirmed transaction means your proof is valid and rewards are being calculated.
If the verification fails, the network will reject the proof. Common reasons include incorrect data formatting or expired timestamps. In such cases, review your input data and resubmit. For deeper technical details on how verification works, refer to the ZKProof Verified Verifiers documentation.
Common mistakes in ZK task completion
Even with the most reliable zkVerify proof verification, a single misstep in the transaction sequence can result in permanent loss of funds. Because ZK tasks often involve complex interactions across multiple networks, the margin for error is slim. You must treat every step with the same caution as a direct wallet transfer.
The most frequent error is selecting the wrong network. Many ZK tasks require proofs to be submitted on specific chains, such as a testnet for development or a mainnet like Ethereum or Polygon for production. Sending a transaction to the wrong address or on an incompatible chain is irreversible. Always verify the target network in your wallet settings before signing any transaction. This is not a minor detail; it is the primary defense against fund loss.
Always double-check the network before sending transactions. Mistakes on testnets may not cost funds, but mainnet errors can be irreversible.
Insufficient gas fees are the second major pitfall. ZK proof generation and verification can be computationally expensive. If your wallet does not hold enough native tokens to cover the gas, the transaction will fail. In some cases, repeated failed attempts can trigger rate limits or lock your account temporarily. Ensure you have a buffer of at least 20% more gas than the estimated requirement to account for network congestion.
Another subtle mistake is ignoring the proof format requirements. zkVerify documentation specifies exact data structures for proofs. Submitting a malformed proof or one that lacks the required metadata will cause the verification to fail silently or return an error that is difficult to debug. Review the official getting started guide to ensure your proof structure matches the validator's expectations.
FAQs about zero-knowledge proof income
Zero-knowledge proofs (ZKPs) allow you to verify eligibility for tasks or transactions without exposing private data. This guide clarifies how the technology works and which assets currently support it.
No comments yet. Be the first to share your thoughts!