What are ZK verified tasks
A ZK verified task is a unit of work in decentralized AI where a worker proves they completed a specific computation without exposing the underlying data. This mechanism bridges the gap between data privacy and model training by allowing users to demonstrate correctness through zero-knowledge proofs.
The process follows a strict sequence. First, the data provider submits encrypted inputs to the network. Next, the worker performs the designated task—such as data labeling or inference—on the encrypted data. Finally, the worker generates a ZK proof that attests to the correct execution of the task. The verifier checks this proof against the public protocol rules. If the proof is valid, the worker receives compensation, and the system accepts the result without ever seeing the raw data.
This approach ensures that sensitive information remains private while maintaining the integrity of the AI training pipeline. By relying on cryptographic verification rather than trust, ZK verified tasks enable secure collaboration between data owners and AI developers.
Set up your wallet and connect to zkVerify
Before you can start completing ZK verified tasks, you need a Web3 wallet configured for the zkVerify testnet. This network operates on its own chain, so your wallet must be set up to recognize its specific network parameters. We will walk through the exact steps to add this network and verify your connection.

Open your preferred Web3 wallet (such as MetaMask). Ensure you have a small amount of ETH in your wallet, as you will need it to pay for the minimal gas fees required to interact with the zkVerify testnet. If you are using a hardware wallet, make sure it is unlocked and connected to your browser.
Navigate to your wallet’s network settings and select "Add Network." You will need to input the zkVerify testnet RPC details. These parameters are available in the zkVerify Getting Started documentation. Entering these details correctly allows your wallet to recognize the chain where ZK verified tasks are hosted.
Visit the official zkVerify testnet portal. Click the "Connect Wallet" button and select your wallet from the list. Once connected, your wallet address will appear in the top right corner. This step confirms that your wallet is properly configured and ready to sign transactions for proof verification.
Find and claim an incentivized ZK verified task
Locating the right ZK verified tasks requires checking the official zkVerify testnet interface and partner platforms like Galxe. These hubs aggregate active campaigns where you can earn rewards for contributing to privacy-preserving AI training.
Start by connecting your wallet to the zkVerify dashboard. Look for the "Tasks" or "Campaigns" tab, which lists available opportunities. Each listing displays the required proof type, the reward amount, and the deadline. Prioritize tasks labeled as "incentivized" to ensure your effort qualifies for airdrops or token rewards.
Next, verify the requirements on partner platforms. Galxe often hosts parallel campaigns that sync with zkVerify. Cross-reference the task ID to avoid duplicate submissions. Once you select a task, click "Claim" to lock in your eligibility before proceeding to the verification step.
Generate and submit your ZK proof
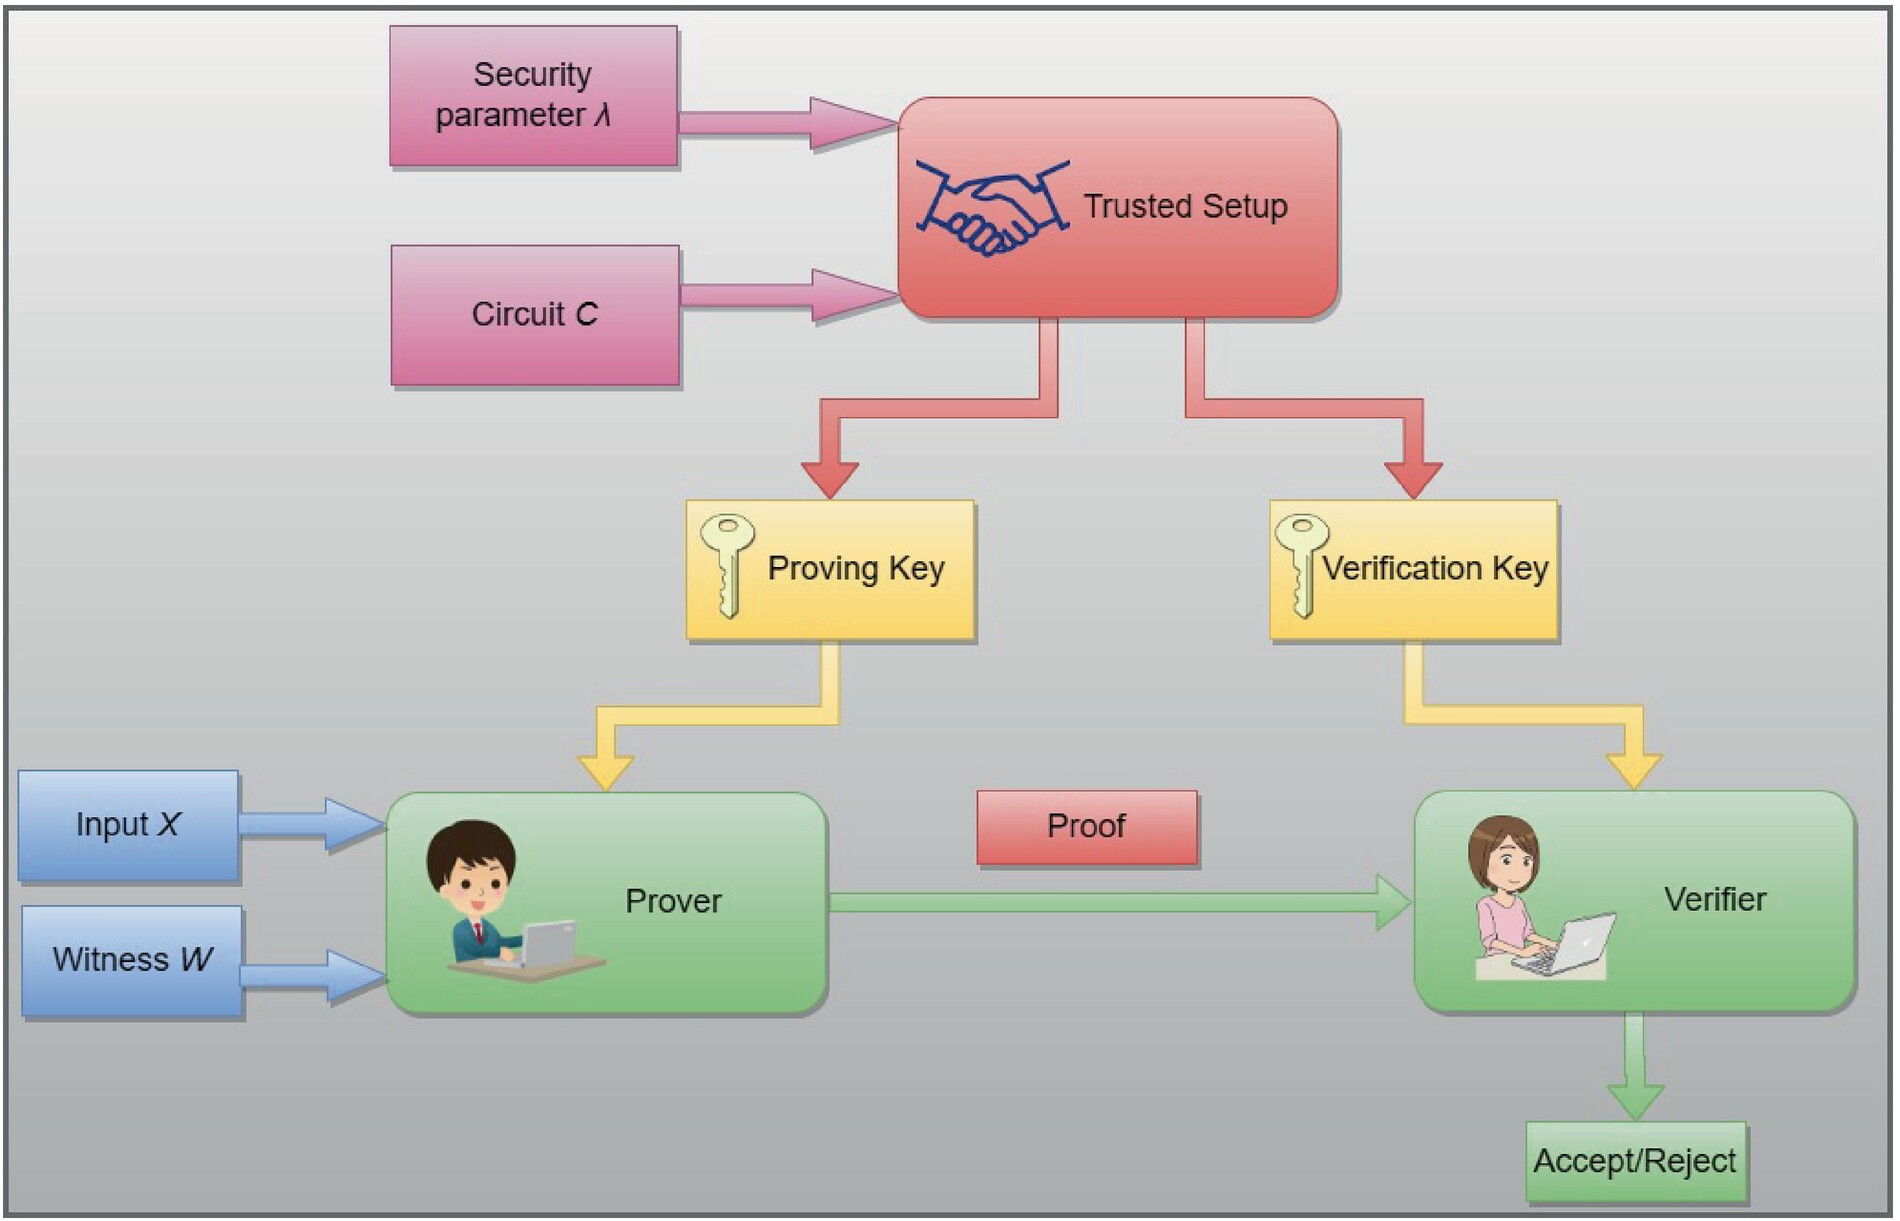
The final phase of completing ZK verified tasks involves generating a cryptographic proof locally or via a cloud provider, and then submitting it to the blockchain for verification. This process transforms your private data into a mathematical guarantee that the task was completed correctly without revealing the underlying information.
Think of this step as sealing a letter in a tamper-evident envelope. The ZK circuit is the mechanism that checks your work, and the proof is the seal. Once generated, you must broadcast this proof to the network so that validators can confirm its validity.
1. Initialize the proving environment
Before generating a proof, ensure your environment is configured with the necessary parameters. Most ZK verified tasks require a specific circuit file (often in JSON or binary format) and a set of public inputs. If you are using a local prover like Circom or SnarkJS, install the required dependencies and download the circuit definition provided by the task issuer.
For cloud-based solutions, log in to your chosen provider’s dashboard. These platforms handle the heavy computational lifting, allowing you to upload your witness data (the private inputs) and receive the proof in return. Ensure you have sufficient credits or API access configured before proceeding.
2. Generate the witness data
The witness is the bridge between your private data and the public proof. It contains all the inputs—both public and private—required to satisfy the circuit’s constraints. You must compute the witness by running your data through the circuit’s arithmetic logic.
If working locally, use the provided witness calculator script. This script takes your raw task data and outputs a JSON file representing the witness. Verify that the witness satisfies all constraints; if the calculation fails, the proof generation will fail. Common errors include mismatched data types or missing private inputs.
3. Run the prover to create the proof
With the witness ready, you can now generate the actual zero-knowledge proof. This step involves complex cryptographic operations that prove the witness satisfies the circuit without revealing the witness itself. The output is a compact proof object, typically consisting of several field elements.
If using a local prover, execute the proving command with your circuit and witness files. This may take several minutes depending on the circuit’s complexity. For cloud provers, submit the witness via API. The provider will return the proof and often a verification key. Keep these outputs secure, as they are required for the next step.
4. Submit the proof on-chain
The final step is to submit the generated proof to the blockchain. This usually involves calling a verification contract function that accepts the proof and public inputs. The contract will verify the proof’s validity and emit an event if successful.
Use a web3 library like Ethers.js or Web3.js to interact with the contract. Ensure you have the correct contract address and ABI for the specific ZK verified task you are completing. After submission, wait for the transaction to be confirmed. Once confirmed, the task is officially complete, and you may be eligible for rewards or reputation points.
Install the necessary ZK libraries (e.g., Circom, SnarkJS) or set up your cloud provider account. Download the specific circuit definition for the task you are completing. Ensure your environment variables are set correctly for the network you are targeting.
Use your private task data to generate the witness. This involves running your inputs through the circuit’s logic to create a JSON file that represents the state of the computation. Verify that the witness is valid before proceeding.
Run the prover with your circuit and witness. This generates the cryptographic proof. If using a cloud provider, submit the witness via API and wait for the proof to be returned. Save the proof and verification key securely.
Use a web3 library to call the verification contract with the generated proof. Ensure you are connected to the correct network and have the right contract address. Wait for the transaction to be confirmed.
Verify your submission and claim rewards
Once you have generated the zero-knowledge proof, the final phase is getting it accepted on-chain. This process confirms that your contribution to the privacy-preserving AI training dataset was valid and eligible for incentives. You must ensure the proof is correctly formatted and submitted to the designated verifier contract before the task window closes.
Submit the proof to the verifier contract
Navigate to the task dashboard and locate the submission interface for your completed ZK verified tasks. Upload the proof file (typically a .json or .snarkjs artifact) and attach the corresponding public input data. The platform will forward this data to the on-chain verifier contract. This step is critical; if the proof fails to verify due to formatting errors or mismatched public inputs, the transaction will revert, and you will not receive credit for your work.
Click the "Submit" button on the task interface. Ensure your wallet is connected and you have sufficient gas for the transaction. The dashboard will generate the transaction payload containing the proof and public inputs.
Wait for the blockchain to process the transaction. The verifier contract will execute the verification algorithm. A successful transaction will emit a ProofVerified event. If the transaction fails, check the error logs for common issues like invalid proof format or expired challenge IDs.
Return to the task dashboard to view your updated status. Successful verification typically updates your eligibility for airdrops or token rewards. Some platforms require a separate "Claim" transaction to withdraw rewards to your wallet.
Claim incentives and airdrop eligibility
Verification alone does not always trigger an automatic payout. Many ZK AI training platforms operate on a periodic distribution model. After your proof is confirmed, you may need to manually claim rewards through a dedicated rewards contract. Keep an eye on official announcements for claim windows. Some projects also tie rewards to snapshot dates, meaning you must have a verified transaction on-chain before a specific block height to qualify for airdrop eligibility.
Final verification checklist
Before moving to the next task, ensure you have completed these steps:
-
Proof file uploaded and transaction submitted
-
On-chain transaction confirmed (check block explorer)
-
ProofVerified event visible in transaction logs
-
Dashboard status updated to "Completed"
-
Rewards claimed or eligible for upcoming snapshot
Common mistakes when submitting proofs
Before you start generating proofs for ZK verified tasks, check the network status. Network congestion can cause timeouts or failed submissions, wasting time and gas.
Incorrect circuit parameters
The most frequent error is mismatching the circuit inputs. If the number of witnesses or the public inputs don’t align with the circuit’s expected structure, verification fails immediately. Always double-check that your input data matches the schema defined by the ZK verified tasks protocol.
Network congestion
Submitting during peak hours often leads to dropped transactions. Proof generation is computationally heavy, and if the underlying chain is congested, your submission may time out before reaching the verifier. Wait for lower gas periods or use a dedicated RPC endpoint to ensure stability.
Wallet disconnections
Proof generation can take several minutes. If your wallet disconnects or the browser tab closes during this window, the session is lost. Keep your wallet active and avoid navigating away from the tab until the proof is submitted and confirmed on-chain.
Ensure your input data matches the circuit schema exactly. Mismatches cause immediate verification failure.
Check gas prices and network health. Submit during low-congestion periods to prevent timeouts.
Keep your wallet active and tab open until the proof is confirmed. Disconnections break the session.
No comments yet. Be the first to share your thoughts!