What are ZK verified tasks
ZK verified tasks represent a shift in how remote work is validated. Instead of relying on screen recordings, time-tracking software, or manager oversight, these tasks use cryptographic proofs to confirm that work was completed correctly.
In this model, a freelancer (the prover) generates a mathematical proof that their output meets specific criteria. A client or automated system (the verifier) checks this proof instantly. This process confirms the result is valid without revealing the underlying data, code, or personal information.
This approach replaces traditional surveillance with privacy-preserving verification. It allows workers to prove they followed instructions and delivered quality work without exposing their methods or identity. The result is a more efficient, trustless workflow that protects both parties.
Set up your ZK proof wallet
Before you can begin completing ZK verified tasks, you need a dedicated digital identity that can interact with zero-knowledge proof networks. This setup process involves configuring a Web3 wallet and connecting it to the zkVerify testnet environment. Think of this as building the foundation for a secure, private ledger where your proof-generating activities are recorded without exposing your personal data.
The zkVerify network is a modular blockchain layer designed to verify zero-knowledge proofs efficiently. It allows applications to offload proof verification, reducing costs and increasing speed. To participate in its incentivized testnet, you must first establish a compatible wallet connection.
Download and install a reputable Web3 wallet extension or mobile app, such as MetaMask or Rabby. Ensure you securely back up your seed phrase offline. This wallet will serve as your primary interface for signing transactions and managing your identity on the zkVerify network.
Navigate to a faucet for the Ethereum Sepolia or Holesky testnet. Request a small amount of testnet ETH to cover gas fees for your initial interactions. zkVerify relies on these underlying networks for transaction settlement, so having testnet funds is essential for completing tasks.
Visit the official zkVerify documentation portal. Locate the testnet dashboard and connect your wallet. Follow the prompts to sign a message, which verifies your identity without revealing personal information. This step initializes your profile for task participation.
Once connected, check your dashboard for a successful status indicator. Ensure your wallet address is visible and linked to the testnet. You are now ready to browse available ZK verified tasks and begin generating proofs.
Generate proofs for completed work
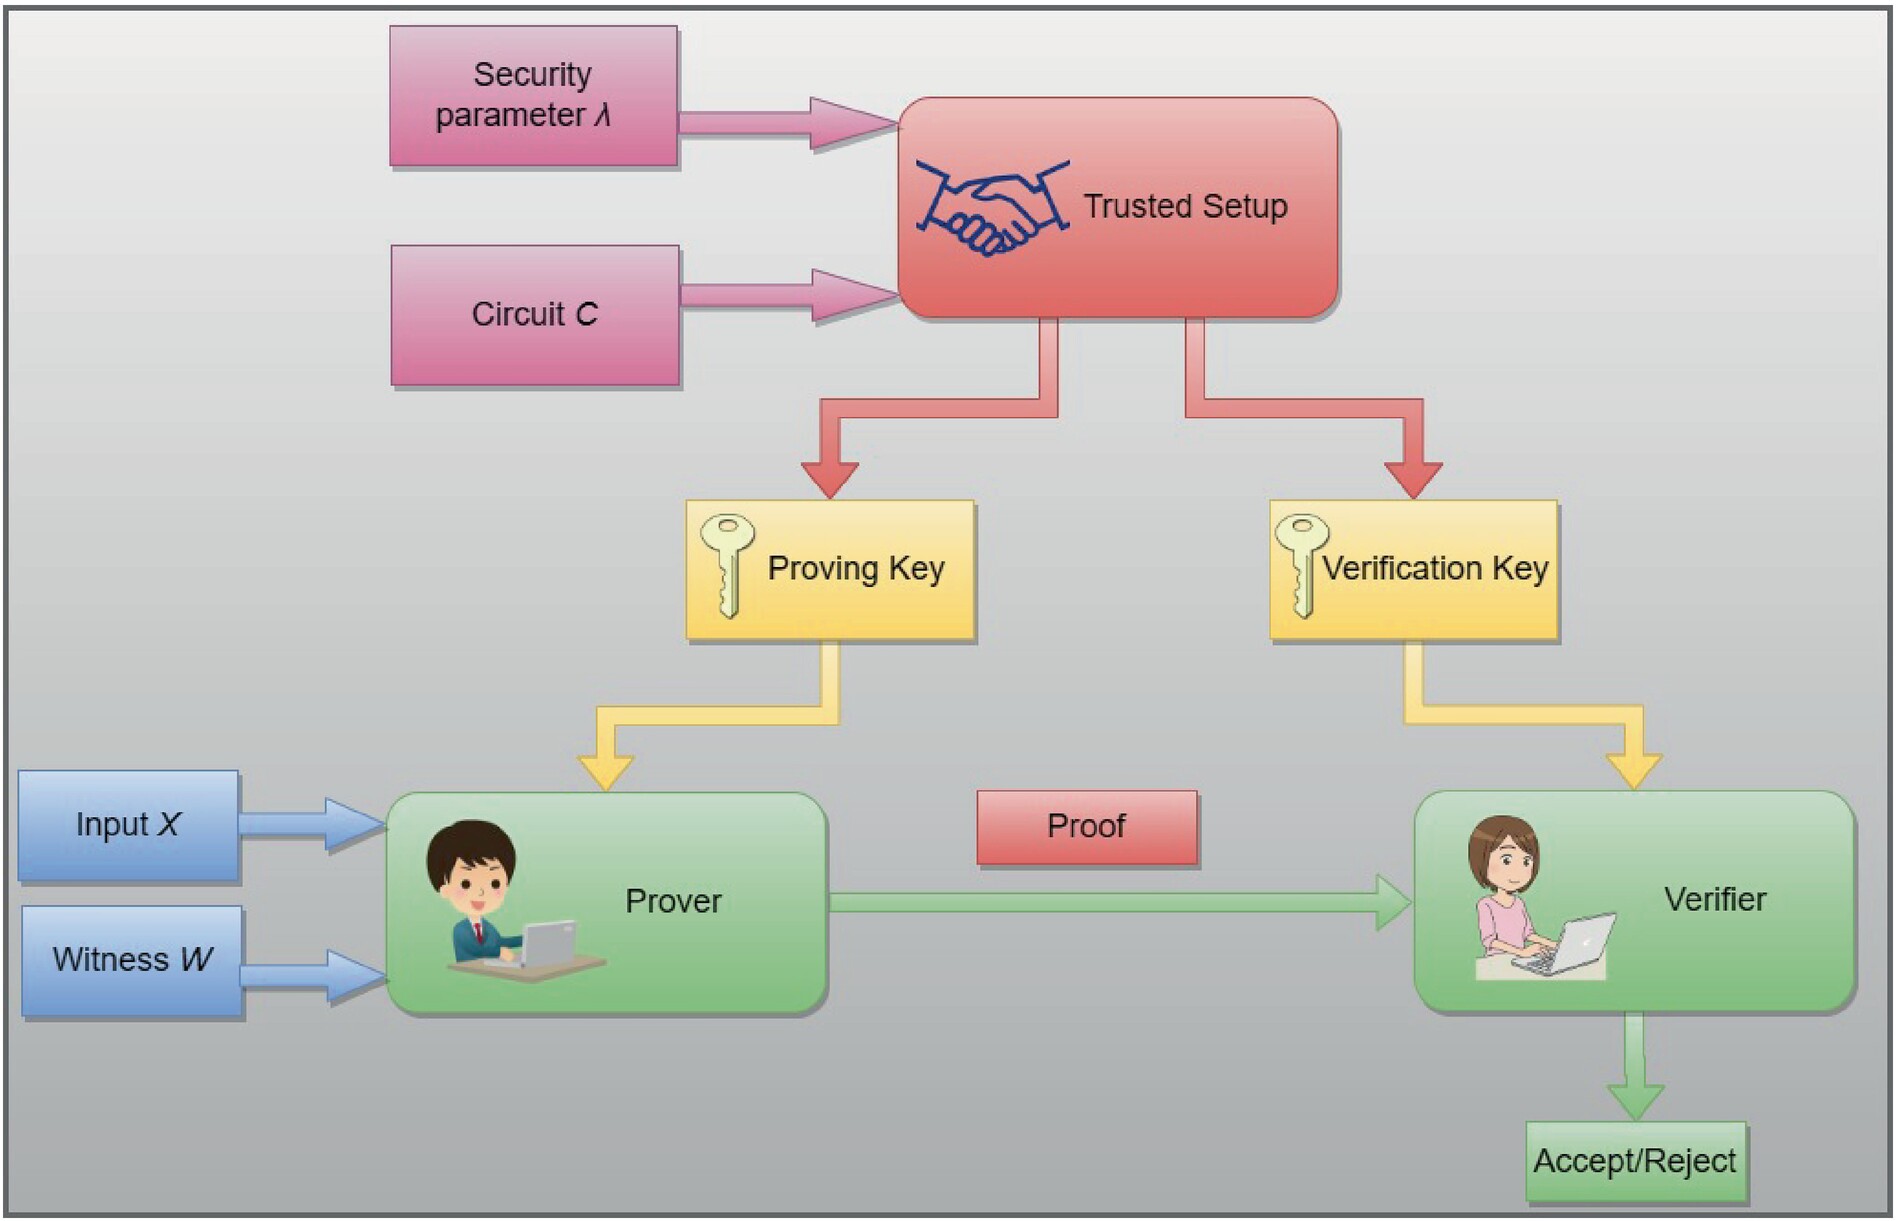
Once your task is finished, the next step is to create a zero-knowledge proof. This proof acts as a cryptographic receipt. It confirms that the work was done correctly without exposing the underlying data or the steps you took to get there. Think of it as a sealed envelope that proves a document exists inside, without showing you the text.
To generate a valid ZK proof for ZK verified tasks, you generally follow a three-part sequence: compile the circuit, run the prover, and export the result.
First, translate your specific task logic into a circuit. This is a mathematical blueprint that defines what inputs are allowed and what conditions must be met for the proof to be valid. You use a language like Circom, Gnark, or Halo2 to write this circuit. The circuit doesn't hold your data; it only holds the rules for verifying it. If your task involves a database query, the circuit checks that the query was executed correctly against the schema, not the actual rows.
With the circuit compiled, you feed your private inputs into the prover engine. This happens locally on your machine or in a secure enclave. The prover uses these inputs to generate a cryptographic witness. This witness is a large set of numbers that represents the internal state of the computation. It is the raw material for the proof. You do not share this witness with anyone. It remains private to your local environment.
The final step is to convert the witness into a compact proof. This proof is a small, fixed-size string of bytes that can be verified instantly by anyone. You submit this proof to the verification layer. The verifier checks the math against the public parameters of the circuit. If the math holds, the proof is accepted. The verifier learns only that the task was completed according to the rules, gaining no insight into your private data or intermediate steps.
Submit and verify on chain
After generating the proof, the final step is to submit it to a verifier. This action confirms that your ZK verified tasks meet the protocol's requirements and triggers any associated rewards. You can submit proofs directly to a smart contract or through a dedicated service like zkVerify, which aggregates verification to lower costs.
1. Prepare the proof data
Before submitting, ensure your proof file is correctly formatted according to the task's specification. Most platforms require the proof in a specific JSON structure, including the public inputs and the proof signature. Double-check that the transaction hash from your previous step is included, as this links the proof to your specific work.
2. Connect your wallet
Navigate to the task submission portal and connect your Web3 wallet. This step authenticates your identity and provides the address where rewards will be sent. Ensure you are connected to the correct network (e.g., Ethereum, Polygon, or the zkVerify testnet) to avoid transaction failures.
3. Submit the proof
Upload your proof file or paste the proof data into the submission field. Click "Submit" to broadcast the transaction. This step sends the proof to the verifier contract or service. The transaction will incur a small gas fee, which varies by network congestion. For complex proofs, using a service like zkVerify can significantly reduce these costs by offloading the heavy verification logic.
4. Wait for verification
Once submitted, the system begins verifying the proof. This process can take anywhere from a few seconds to several minutes, depending on the proof type and network load. During this time, your task status will show as "Verifying." Do not close the browser window or refresh the page prematurely, as this may interrupt the status update.
5. Confirm success
After verification, the status will update to "Success" or "Failed." If successful, the smart contract records your proof on-chain, and any rewards are distributed to your wallet. You can view the transaction hash on a block explorer to confirm the on-chain record. If the verification fails, check the error message for clues, such as an invalid proof format or mismatched public inputs.
Common Proof Errors and Fixes
When submitting ZK verified tasks, a failed transaction usually stems from two sources: invalid circuit constraints or unexpected gas costs. Even if your proof is mathematically sound, the blockchain may reject it if the data format doesn't match the verifier's strict requirements.
Fixing circuit limits to account for
A proof is only as good as the circuit that generated it. If the circuit constraints are invalid, the verifier will reject the proof immediately, regardless of the underlying data. Ensure your witness data aligns perfectly with the public inputs defined in the circuit. A single mismatched bit can invalidate the entire proof, wasting your time and resources.
Managing Gas Fees
Verifying ZK proofs on-chain can be expensive, often costing significantly more than standard transactions. Before submitting, always check current gas fees on your target network. Using a layer-2 solution or a dedicated verification layer like zkVerify can drastically reduce these costs, making the process more efficient for freelancers.
Validating Proof Format
Ensure your proof is in the correct format (e.g., G1/G2 points for BLS12-381) and that the public inputs are correctly encoded. Many errors arise from simple encoding mistakes, such as sending a string instead of a hashed value. Double-check the API documentation for the specific verifier you are using to ensure your data matches the expected schema.
Verifying on Testnets First
Never submit a proof directly to the mainnet without testing on a testnet first. Testnets allow you to catch errors in your circuit or data encoding without risking real funds. Use this opportunity to validate the entire workflow, from proof generation to on-chain verification, ensuring a smooth experience when you go live.
No comments yet. Be the first to share your thoughts!