What are ZK verified tasks
ZK verified tasks allow freelancers to prove they completed work without exposing their identity or the sensitive data involved. This is built on zero-knowledge proofs (ZKPs), a cryptographic protocol where a prover convinces a verifier that a statement is true without revealing any underlying information.
In this context, the freelancer is the prover and the client or platform is the verifier. When you submit a task, you generate a cryptographic proof that validates your work against the project requirements. The client receives this proof and can confirm the task is complete and correct, all while remaining ignorant of who you are or what specific data you processed.
This separation of verification from revelation is the core mechanism of anonymous freelancing. It solves the privacy paradox in remote work: how to demonstrate competence and completion without handing over personal details or proprietary information. Security here is mathematically sound, ensuring that the correctness of computations is verified without exposing the inputs or intermediate steps.
Compare ZK proof frameworks
Choosing the right ZK proof framework depends on your specific anonymity requirements, coding comfort, and performance needs. There is no single "best" tool; each has distinct tradeoffs in complexity, proof size, and verification speed. Use the comparison below to identify which framework aligns with your task verification goals.
The landscape includes circuit-based compilers like Circom, JavaScript-based tools like SnarkJS, and Rust-based systems like Halo2. Circom is excellent for defining complex logic but requires careful circuit design. SnarkJS offers a quick start for prototyping but is generally too slow for production-scale verification. Halo2 provides high performance and modularity but has a steeper learning curve due to its Rust foundation.
| Framework | Learning Curve | Proof Size | Verification Speed |
|---|---|---|---|
| Circom | Moderate | Small | Fast |
| SnarkJS | Low | Medium | Slow |
| Halo2 | Steep | Very Small | Very Fast |
| Framework | Learning Curve | Proof Size | Verification Speed |
|---|---|---|---|
| Circom | Moderate | Small | Fast |
| SnarkJS | Low | Medium | Slow |
| Halo2 | Steep | Very Small | Very Fast |
For anonymous freelancing, Circom is often the preferred choice for its balance of expressiveness and efficiency. It allows you to define precise logical constraints, which is critical when verifying task completion without revealing sensitive client data. If you are prototyping or building a simple proof-of-concept, SnarkJS lets you get up and running quickly in JavaScript. However, for high-volume or privacy-critical applications, Halo2 offers the best performance, albeit with a more complex development process.
Define the task circuit logic
A zero-knowledge circuit acts as a digital gatekeeper. It defines exactly what counts as a "verified" task without exposing the underlying data. For anonymous freelancing, this means proving you completed the work—such as submitting a specific file hash or hitting a timestamp—without revealing your identity or the proprietary nature of the content.
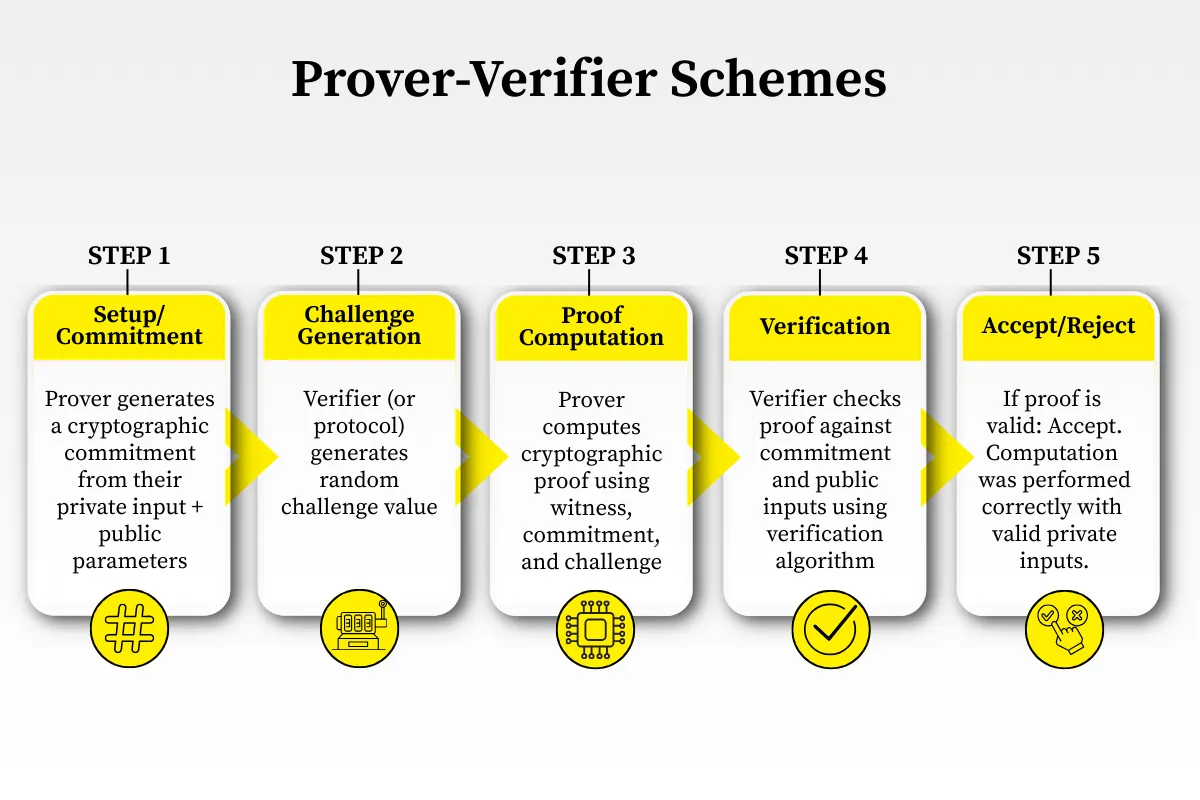
The circuit logic follows a three-part sequence: commitment, challenge, and response. You commit your inputs, the system issues a challenge, and your code generates a response that proves validity. This structure ensures that only tasks meeting strict criteria are approved for payment.
Map inputs and limits to account for
Start by listing every piece of data the freelancer must provide. These are your public inputs (e.g., task ID, deadline) and private inputs (e.g., the actual work product). The circuit must constrain these inputs to ensure they match the job requirements. For example, a constraint might verify that the submitted file size falls within a specific range or that the hash matches a known template.
Set verification rules
Define the boolean logic that determines success. This is where you translate business rules into circuit constraints. If the task requires a specific output format, the circuit must reject any input that doesn't align. Use simple comparisons and logical operators to build these rules. The goal is to create a rigid but efficient verification path that leaves no room for ambiguity.
Generate the proof
Once the inputs are constrained and the rules are set, the circuit generates a zero-knowledge proof. This proof is a compact cryptographic snippet that attests to the fact that all constraints were satisfied. It does not contain the original data, only the mathematical assurance that the data existed and was valid. This proof is what the smart contract verifies to release payment.

List the data points required for verification. Separate public identifiers (like task ID) from private work products to ensure privacy is maintained while allowing public auditability.
Write logic that restricts input values. For example, ensure a file hash matches a known pattern or that a timestamp is within an acceptable window. These constraints form the core of your verification.
Compile the circuit to produce a proof. This cryptographic snippet confirms that all constraints were met without revealing the underlying data, allowing the smart contract to verify validity instantly.
Generate and verify proofs
To build a ZK verified task, you must first translate the freelance work into a format a circuit can understand. This process turns human-readable output—like a completed graphic design or written article—into mathematical statements. The goal is to create a proof that confirms the work was done correctly without exposing the underlying data or the freelancer's identity.
1. Compile the task circuit
Start by defining the logic of the task in a high-level language like Circom or Halo2. This circuit acts as the rulebook for what constitutes "valid" work. For example, if the task is verifying a specific code commit, the circuit checks that the commit hash matches the repository and that the code compiles successfully. This step ensures that only tasks meeting the exact criteria can generate a valid proof.
2. Generate the witness
The witness is the actual data being proven. In an anonymous freelancing context, this includes the work product and the freelancer's credentials, encrypted or hashed to preserve privacy. The prover uses this witness data alongside the circuit to calculate the intermediate values. Think of the witness as the raw ingredients; the circuit is the recipe, and the resulting proof is the baked cake that proves the recipe was followed.
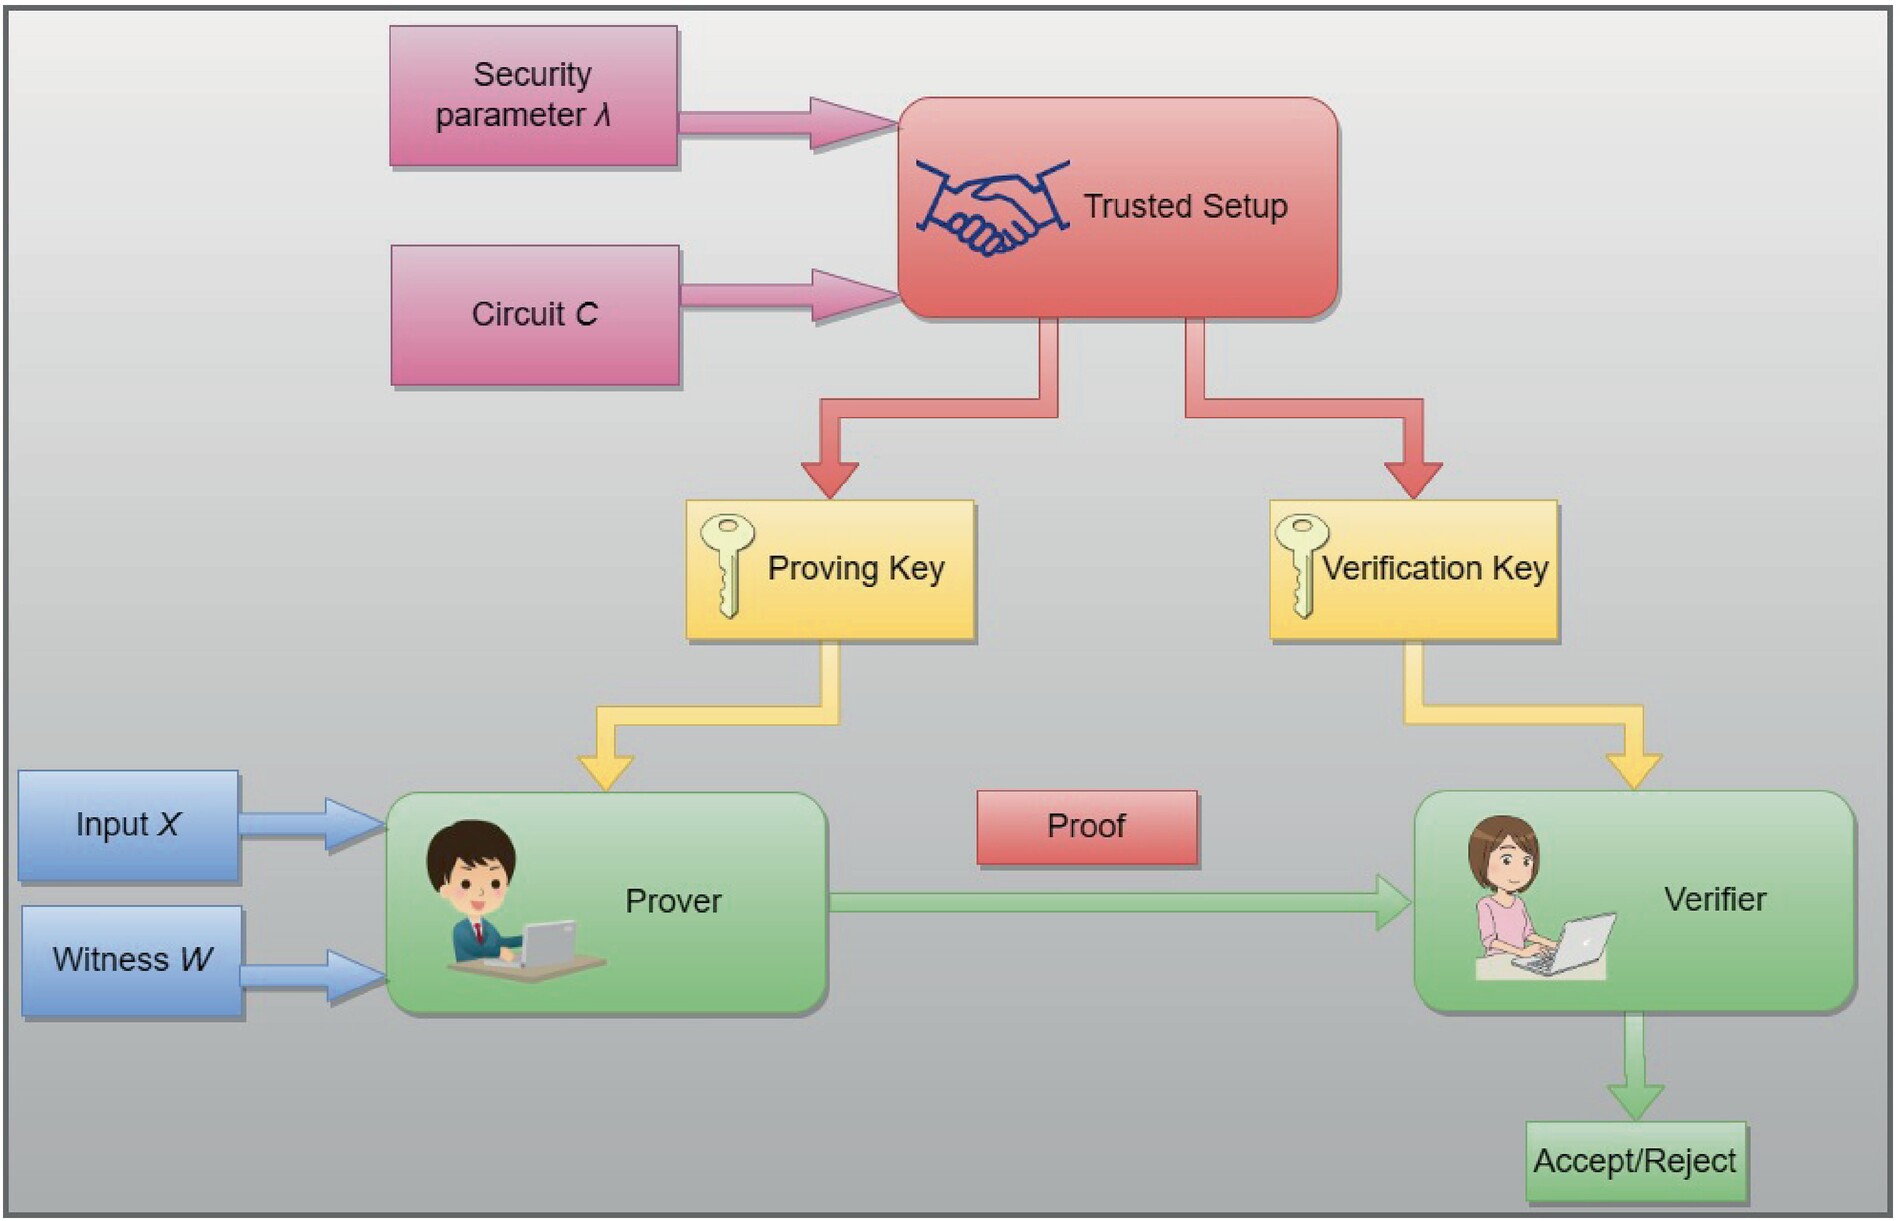
3. Create the zero-knowledge proof
Using a trusted setup or a transparent setup depending on the circuit, the prover generates the cryptographic proof. This step is computationally intensive but ensures that the proof is succinct. A succinct proof is small enough to be transmitted easily and verified quickly, regardless of how complex the original task was. This is the core of ZK technology: compressing complex verification into a tiny, unforgeable token.
4. Verify on-chain or off-chain
Once generated, the proof is submitted to a verifier contract on a blockchain or a centralized oracle. The verifier checks the proof against the public parameters of the circuit. If the math holds up, the contract emits a "verified" event, triggering the release of payment or access to the next task phase. This verification is trustless; the blockchain doesn't need to know what the work was, only that the proof is valid.
Write the circuit code that defines the exact conditions for task completion. This is the static rule set that all proofs must adhere to.
Run the compiler to generate the proving and verification keys. This step prepares the mathematical structures needed for efficient proof generation.
Input the private work data (witness) into the prover. The system generates the compact zero-knowledge proof that certifies the work was done correctly.
Send the proof to the verifier contract. The contract checks the proof's validity and, if successful, triggers the reward or access mechanism.
Deploy the verification contract
The verification contract is the final piece of your anonymous freelancing infrastructure. It acts as the gatekeeper: it accepts ZK proofs, validates that the work meets the agreed-upon criteria, and triggers the payout or credential issuance. Because this contract handles payments, every line of code matters.
Before you deploy to mainnet, treat the testnet as your sandbox. This is where you stress-test the proof verification logic and ensure the gas costs for verification remain predictable. zkVerify’s documentation emphasizes that proofs are verified in seconds, allowing you to build responsive systems without the latency of optimistic dispute windows [src-serp-3].
1. Configure access control and payment logic
Start by defining who can submit proofs. Use role-based access control (RBAC) to ensure only authorized task creators can initiate verification requests. Define the payment terms directly in the contract: specify the token, amount, and recipient address. This transparency prevents disputes later.
2. Integrate the ZK verifier
Import the verified ZK circuit verifier into your contract. This is the component that actually checks the mathematical validity of the proof. Ensure your contract rejects any proof that fails verification, returning the stake to the prover or penalizing the submitter as defined in your terms.
3. Test on a testnet
Deploy to a testnet like zkVerify’s incentivized testnet. Submit test proofs and verify that the contract correctly releases funds or credentials. Check the gas usage to ensure the verification step doesn’t exceed your budget limits.
4. Audit and mainnet deployment
Once testnet tests pass, have your contract audited. Zero-knowledge systems are complex; a single bug can lead to lost funds. After the audit, deploy to mainnet. Monitor the first few transactions closely to ensure the proof verification process runs smoothly.

Install the necessary SDKs and configure your wallet to connect to the zkVerify testnet. Ensure you have testnet tokens for gas fees.
Use Hardhat or Foundry to deploy your verification contract to the testnet. Verify the source code on a block explorer for transparency.
Generate valid ZK proofs for sample tasks and submit them to your contract. Verify that the contract accepts them and triggers the payout.
Submit invalid proofs to ensure the contract rejects them correctly. Check that gas costs are reasonable for both success and failure cases.
After passing all tests and completing an audit, deploy the contract to the mainnet. Monitor the first few live transactions closely.
No comments yet. Be the first to share your thoughts!